

这篇文章记录了我在做毕设的途中,学习使用mask2former的全流程与错误记录。
目录
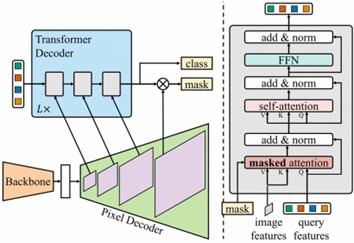
Mask2former环境配置与运行
Github地址:Mask2Former
安装环境
miniconda
下载官网地址:Miniconda — miniconda 文档
配置环境变量:Linux设置miniconda环境变量-CSDN博客
无sudo权限可在Windows更改完后上传。
miniconda使用说明:Linux下Miniconda的安装及其使用-CSDN博客
Python
安装的软件包: python=3.8
pytorch==1.9.0 torchvision==0.10.0 cudatoolkit=11.1
推荐安装cuda=11.1的。归根结底要跟自己的服务器上的cuda版本相匹配,以便于后续Detectron2安装版本匹配。 “Detectron2 CUDA Compiler”、“CUDA_HOME”、“PyTorch built with - CUDA”相匹配
python -m detectron2.utils.collect_env
Detectron2:Detectron2安装说明
建议从源码安装,
# 在工作目录下使用下列指令下载detectron2
git clone https://github.com/facebookresearch/detectron2.git
python -m pip install -e detectron2
opencv=4.8.1
其他必备的库(在requirements.txt中) pip install -r requirements.txt
全流程实例:
conda create --name mask2former python=3.8 -y
conda activate mask2former
conda install pytorch==1.9.0 torchvision==0.10.0 cudatoolkit=11.1 -c pytorch -c nvidia
pip install -U opencv-python

# under your working directory
git clone https://github.com/facebookresearch/detectron2.git
cd detectron2
pip install -e .
pip install git+https://github.com/cocodataset/panopticapi.git
pip install git+https://github.com/mcordts/cityscapesScripts.git
# 转到Mask2Former的路径下
cd ..
# git clone git@github.com:facebookresearch/Mask2Former.git
cd Mask2Former
pip install -r requirements.txt  # 安装其他必备库
cd mask2former/modeling/pixel_decoder/ops  # 为 MSDeformAttn 编译 CUDA 内核
sh make.sh
安装数据集
目前只装了COCO,ADE20K(语义分割部分)数据集
数据集路径准备
Detectron2查找数据集的路径如下:
$DETECTRON2_DATASETS/
  ADEChallengeData2016/
  coco/
  cityscapes/
  mapillary_vistas/
其中$DETECTRON2_DATASETS为环境变量中指定的内置数据集的位置。如果未设置,则默认值相对于当前工作目录下的./datasets
环境变量设置:
在.bashrc文件中写入 export DETECTRON2_DATASETS=/path/to/datasets
然后在终端输入:source ~/.bashrc更新配置文件
数据集下载
COCO
COCO下载
Images中需要下载2017 Train/Val images
Annotations中需要下载2017 Train/Val annotations 和 2017 Panoptic Train/Val annotations 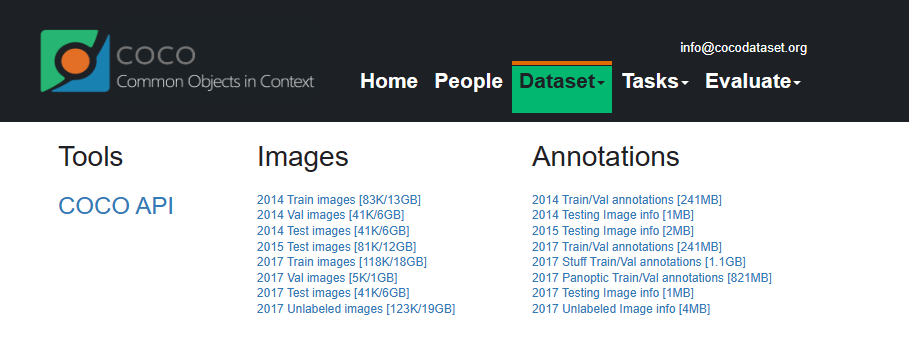
预期数据集结构:
coco/
  annotations/
    instances_{train,val}2017.json
    panoptic_{train,val}2017.json
  {train,val}2017/
    # image files that are mentioned in the corresponding json
  panoptic_{train,val}2017/  # png annotations
  panoptic_semseg_{train,val}2017/  # 这是由下文所示脚本文件生成的文件路径
在工作目录下使用如下指令下载数据集压缩包:wget 下载链接,然后解压指定文件:unzip 指定文件最终达到上文所示文件结构。
安装 panopticapi:pip install git+https://github.com/cocodataset/panopticapi.git
从全景注释中提取语义注释(仅用于评估):python datasets/prepare_coco_semantic_annos_from_panoptic_annos.py 生成panoptic_semseg_文件
ADE20K for Semantic seg
ADE20K下载
下载Scene Parsing中的Data。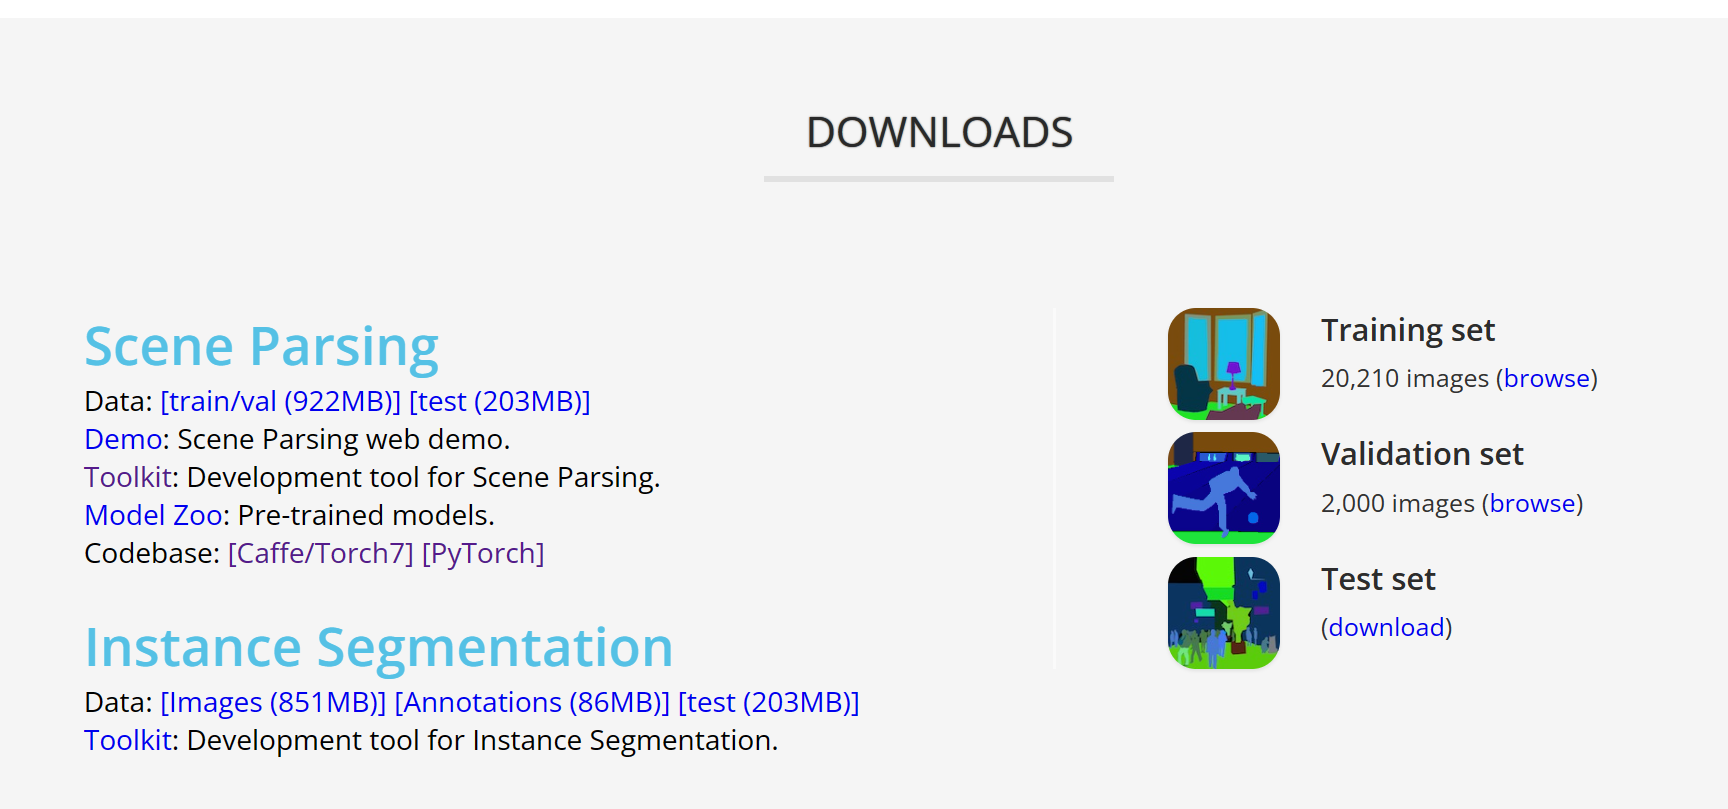 预期数据结构:
ADEChallengeData2016/
  images/
  annotations/
  objectInfo150.txt
  # generated by prepare_ade20k_sem_seg.py
  annotations_detectron2/
运行如下指令生成annotations_detectron2/: python datasets/prepare_ade20k_sem_seg.py
解决报错
当装好环境和数据集后,尝试运行训练文件train_net.py 需要修改GPU数目,服务器数目,并自行指定学习率和batch_size大小
python train_net.py --config-file configs/coco/panoptic-segmentation/maskformer2_R50_bs16_50ep.yaml --num-gpus 1 --num-machines 1 SOLVER.IMS_PER_BATCH 2 SOLVER.BASE_LR 0.0001
1.unexpected keyword argument ‘dtype’ in torch.cuda.autocast
可以看到第一个报错是意外实参dtype,定位到代码位置是detectron2/detectron2/engine/train_loop.py/493
试分析问题原因是pytorch1.9版本的autocast()函数不再支持参数传递
解决办法是移除实参dtype=self.precision。
网上查阅到的无效解决办法:python - TypeError: __init__() got an unexpected keyword argument ‘device_type’ in torch.cuda.autocast - Stack Overflow
2.AttributeError: module ‘distutils’ has no attribute ‘version’
尝试从 distutils 模块访问 version 属性时发生此错误
问题原因:因为 setuptools 版本59.6.0中的更改以某种方式中断了对 version 属性的调用。在最新版本中,version 属性似乎已经从 distutils 中删除。
运行dir()函数来确认version属性删除:
from setuptools import distutils
print(distutils.__version__, dir(distutils))
解决方法:将 setuptools 版本固定到59.5.0或升级torchpip install setuptools==59.5.0
参考文章: pytorch - AttributeError: module ‘distutils’ has no attribute ‘version’ - Stack Overflow
Python AttributeError: module ‘distutils‘ has no attribute ‘version‘CSDN博客
医学数据集注册与使用
kvasir-SEG数据集介绍
Kvasir-SEG数据集官网
它是胃肠道息肉图像和相应分割mask的开放获取数据集,由经验丰富的胃肠病学家手动注释和验证。
Detectron2数据集注册
请参考Detectron2官方文档:数据集注册
具体配置信息可在如下位置找到: mask2former/data/datasets/register_kvasir_seg_semantic.py
预期数据集结构如下所示:
$DETECTRON2_DATASETS/
  kvasir-SEG/
    train/
      images/
      masks/
    val/
      images/
      masks/
由于我在解压缩数据集前新建了一个同名文件夹,所以我在register的代码中的数据集路径为kvasir/kvasir-SEG,请各位自行更改register代码即可。
与mask2former模型输入相匹配
由于kvasir数据集的mask包含RGB三通道,因此需要在semantic mapper与sem_seg_evaluation中修改mask读入方式为灰度图。
"""修改读取mask文件方式转为灰度图读取"""
# sem_seg_gt = utils.read_image(dataset_dict.pop("sem_seg_file_name")).astype("double") #这个读出来是个二维数组
# 以下是为了kvasir进行修改读取mask文件方式转为灰度图读取的部分
gt_image = Image.open(dataset_dict.pop("sem_seg_file_name")).convert('L')
gt_binary_array = np.asarray(gt_image)
sem_seg_gt = np.where(gt_binary_array > 0, 1, 0).astype("double")  # .astype(np.uint8)